Refresh token with JWT authentication in Node.js
When designing a web application, along with security authentication is one of the key parts. Authentication with tokens was a breakthrough in this regard, and the refresh token came to complement it and make it usable.
Authentication
Authentication systems are divided according to how they verify the user:
– Based on something known (password)
– Based on something possessed (identity card, usb, token)
– Based on physical characteristics (voice, fingerprints, eyes)
Token-based authentication
Tokens were introduced into web applications by modern authentication and authorization. We could say that its use was extended thanks to the OAuth protocol (later OAuth2). These were focused on authorization, and not on authentication as one tends to think.
When we talk about authentication with tokens, we can divide it into 2 types:
1. Translated with www.DeepL.com/Translator
Until recently it has been the most common authentication mode. When a user logs in, the server returns a token that is typically stored in a cookie. The server saves the session information, either in memory or in a database (Redis, MongoDB…).
Thus, each time the user makes a request with that token, the server searches for information to know which user is trying to access and if it is valid, it executes the requested method.
This type of authentication has several problems, such as the overload caused by all the information of authenticated users. As well as scalability, since if there are several instances of the server raised, they would have to share in some way the information of the session so as not to make you log in again.
In addition, there are vulnerabilities due to this architecture (CORS, CSRF).
2. Statusless token-based authentication
In order to solve all these problems, stateless authentication arises. This means that the server will not store any information, nor will the session.
When the user is authenticated with his credentials or any other method, he receives an access token in the answer (access token). From that moment on, all requests made to the API will carry this token in an HTTP header so that the server can identify which user makes the request without having to search the database or any other storage system.
With this approach, the application becomes scalable, since it is the client itself that stores its authentication information, and not the server. This way, requests can reach any instance of the server and can be attended without synchronization.
Different platforms can use the same API
It also increases security, avoiding CSRF vulnerabilities, as there are no sessions. And if we add expiration to the token the security will be even greater.
JWT (JSON Web Token)
JSON Web Token (JWT) is an open standard based on JSON to create access tokens that allow the use of application or API resources. This token will incorporate the information of the user who needs the server to identify it, as well as additional information that may be useful (roles, permissions, etc.).
It may also have a validity period. Once this validity period has elapsed, the server will no longer allow access to resources with this token. In this step, the user will have to get a new access token by reauthentication or with some additional method: refresh token.
JWT defines JSON as the internal format to be used by the information stored in the token. In addition, it can be very useful if used in conjunction with JSON Web Signature (JWS) and JSON Web Encryption (JWE).
The combination of JWT together with JWS and JWE allows us not only to authenticate the user, but also to send the encrypted information so that only the server can extract it, as well as validate the content and make sure that there has been no impersonation or modification.
A JWT token consists of 3 parts separated by a . being each one of them:
- Header: with the type (JWT) and type of coding

- Payload: It is where the user’s information will be found that will allow the server to discern whether or not it can access the requested resource

- Signature: The signature function will be applied to the other two token fields to obtain the check field
Types of token
There are many types of token, although in authentication with JWT the most typical are access token and refresh token.
- Access token: It contains all the information the server needs to know if the user / device can access the resource you are requesting or not. They are usually expired tokens with a short validity period.
- Refresh token: The refresh token is used to generate a new access token. Typically, if the access token has an expiration date, once it expires, the user would have to authenticate again to obtain an access token. With refresh token, this step can be skipped and with a request to the API get a new access token that allows the user to continue accessing the application resources.
It may also be necessary to generate a new access token when you want to access a resource that has not been accessed before, although this depends on the restrictions on API implementation.
The refresh token requires greater security when it is stored than the access token, as if it were stolen by third parties, they could use it to obtain access tokens and access the protected resources of the application. In order to cut a scenario like this one, a system must be implemented in the server to invalidate a refresh token, besides setting a lifetime that obviously must be longer than that of the access tokens.
Refresh token and JWT. Implementation in Node.js
For this example I will skip the database part and therefore some security checks that should be done, although I will comment on them. The reason is to show a code as simple as possible and not condition the implementation to any permanency system.
In this first code we simply boot a node server as we would do with any other application.

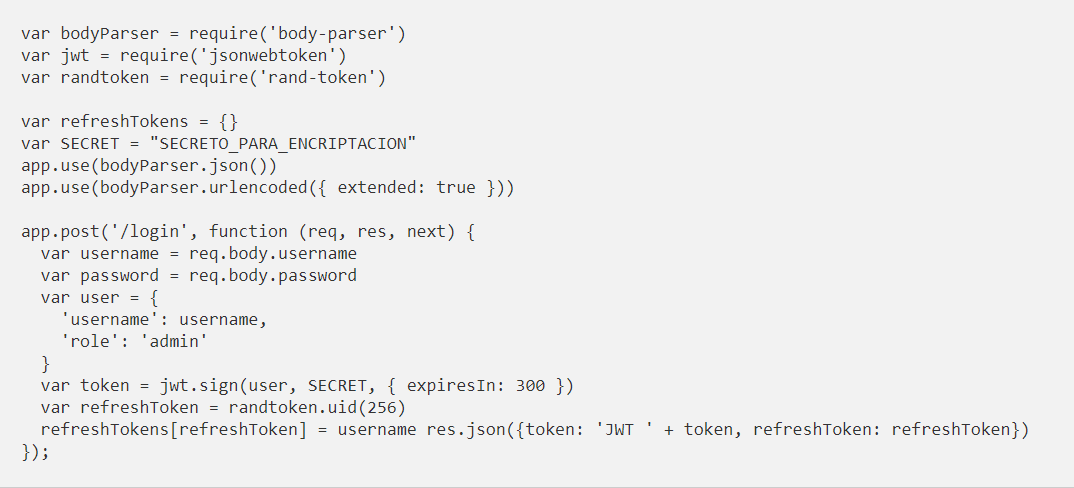
The first thing we are going to add is a method to authenticate the user. The authentication method can be any method, although the most typical is to use username and password. This is the one we have used, although to simplify the code is not checked against database and we allow access to all users (with any password).
In the answer we will return both the JWT token and the refresh token with which you can request new access tokens. As we see in the implementation the token is being created with a validity time of 300 seconds (5 minutes).
With the jsonwebtoken module we will encrypt and generate the signature, that is to say, it will automatically generate the JWT token by simply passing it the object to encrypt and the key that we will use both to encrypt and to decrypt afterwards.
For the refresh token, we will simply generate a UID and store it in an object in memory along with the associated user username. It would be normal to save it in a database with the user’s information and the creation and expiration date (if we want it to be valid for a limited period of time).
It could also make it self-contained, like the access tokens we create. The advantage of this implementation would be to not access the database to extract the necessary information. But in this case it would not let us know if the refresh token has been blacklisted or overridden by an administrator, so we are not interested. Or if the user has been disabled by an administrator, we wouldn’t notice it either. That’s why this type of tokens I prefer to implement without self-contained information.

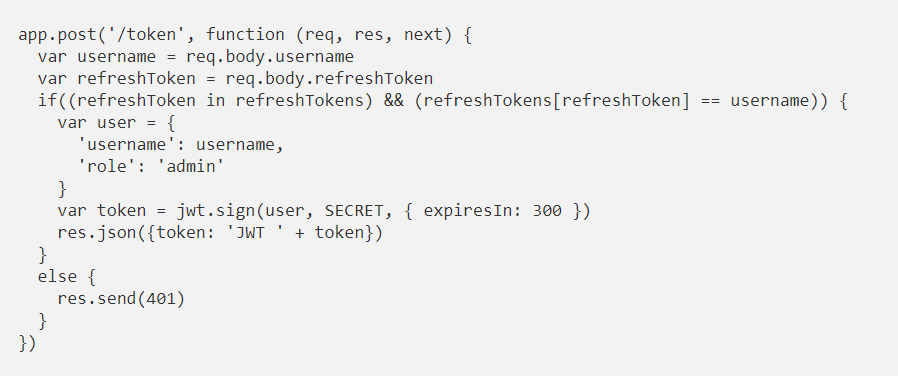
To request a new access token we have created the /token resource. In it we receive refresh token and as an additional control the username of the user who owns the refresh token. Here what we will do is check that in our list of refresh tokens is the one you send us and that it has the same username associated. If it is correct, we generate a new token with the user’s information (which we would obtain from the database) and return it.
If in our application the administrator could temporarily disable users or refresh tokens in our application, we would also have to check it before generating the new access token.

In this architecture it is necessary to have a way to disable a refresh token, for the cases in which it can be subtracted, and thus avoid impersonation and misuse.
In an application in which a user can be working from different devices, with a single identity (same username) but with different tokens on each device, if one of these is lost or stolen, this method would allow the administrator to delete or disable the refresh token in question without the user being left without service on the other devices. No need to re-authenticate, change your password, etc. That is, you can continue to work without being influenced by anything and without the risk of new access tokens being generated from the stolen device. It is recommended that the access tokens have a short lifespan so that in cases such as this one, it can be returned to a safe state quickly.
To do this we have created a /token/reject resource for which you can disable a refresh token. In this case we simply deleted it from our list in memory. In a complete implementation it would be necessary to verify that the user who makes the request is an administrator or has the permissions for this resource.

Finally, we will expose a resource that can only be accessed by sending a header with a previously obtained JWT token, which will have been generated by our application and signed with our key (SECRET)
In this case we will use Passport. Passport is a middleware for authentication in Node.js. It is very flexible and modular. This is reflected in a large number of modules, each of which implements a different authentication strategy (JWT, Twitter, Facebook, Google, Auth0, SAML… and so on up to 300). We can use any of them, importing and configuring it in a very simple way and delegating the most complex part of authentication to Passport.
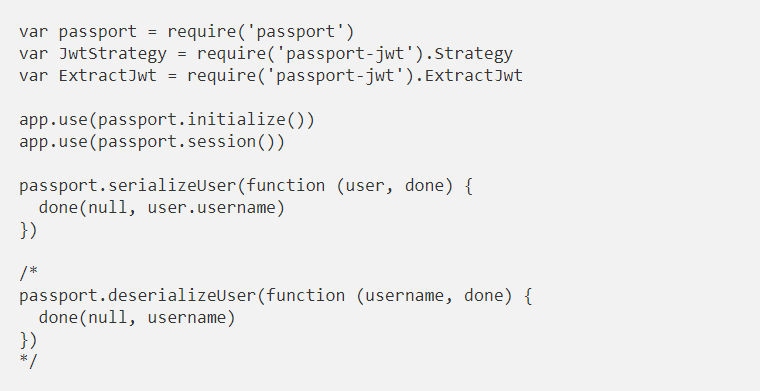
First we will load the middleware and the necessary objects. Passport requires that we implement serializeUser methods (and depending on the strategy also the deserializeUser), which are used for middleware to store the user object in the session with the fields we want and tell you which field we want it to index. In our example we indexed it by username, but the ideal would be to use an ID.
The truth is that since it is stateless authentication, the sessions don’t make sense, and Passport will never use deserialization if we only use JWT. I left it commented on in case we wanted to introduce new strategies.

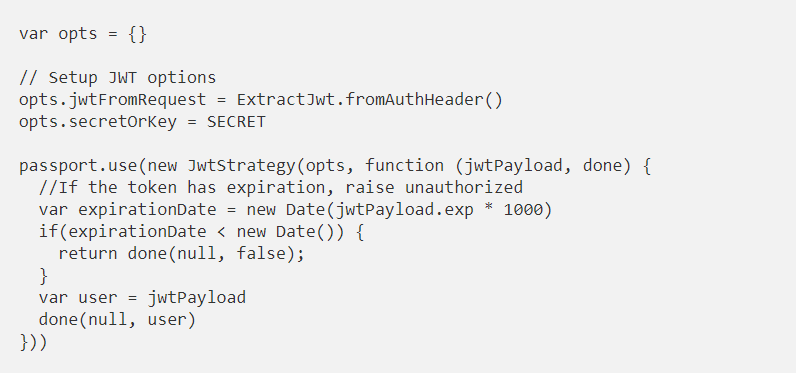
For the configuration of the JWT module we only have to tell you where the token will arrive in the requests, in our case we wait for you in the Authorization header, and what is the key to decrypt the JWT tokens.
And finally, we will say what we want to do with the information extracted from the token every time a request arrives at a resource that uses this authentication. The variable jwtPayload will have the user object that we encrypt in the user’s login:

The configuration of our strategy would be as follows:

The resource we will create to test authentication is /test_jwt. And we’ll just tell Passport that access to that path authenticates it with the “jwt” strategy. This gives us an idea that with Passport we can authenticate each resource with a different strategy, which gives us great flexibility and in a very simple way.

Conclusion
Using JWT allows us to increase the efficiency of our applications by avoiding multiple database calls, and thus reducing latency. Furthermore, with the use of refresh tokens we improve the security and usability of this architecture.
The use of tokens for authentication is useful in a large number of projects, but it is not the Holy Grail that solves all problems or serves for all products, but we must take it into account when proposing any solution.
