Automate API testing using Postman
In this post we will see how a regression test can be automated using Postman that verifies the correct operation of an API. This test is useful for when modifications or improvements are made to it. For this we are going to use as an example an API that allows registering users and booking appointments for a service.
In this post, we assume that the reader has a basic understanding of the different types of API requests and knows how to create a collection, create a basic request, and save that request using Postman. If not, we advise taking a look at the Postman documentation .
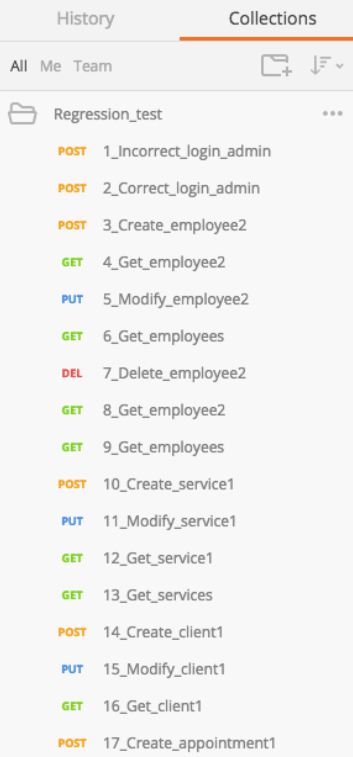
Since we are going to perform an automatic test, the maximum user interaction should be hitting the Run button, at most. Therefore, the test will be made up of a collection that contains a series of requests that will check the full functionality of the API. For this it is necessary that the data obtained from the GET requests be used in PUT, POST or DELETE requests. Figure 1 shows part of the requests for a regression test. It is advisable to number them to be able, in case of error, to quickly locate the requests that have failed.

Figure 1. Requests to automate API tests.
As a first example we are going to see a request in which an administrator registers a user. This request is shown in Figure 2.

We see that the request sent is of the POST type and that it accesses the following API address:
{{API_WS_URL}}/clients?source=adminWeb
The first part {{API_WS_URL}},, is an environment variable that stores the true URL of the API. There are also global variables. Let's first see what these types of variables are and what they are for.
Environment variables and global variables
An environment variable is, as the name suggests, a variable that is stored in the workbench. These variables can be created statically, or dynamically. Also, an environment variable can make use of other environment variables. The workbench is shown in the upper right of Figure 2. In this example, the API-Test environment is being used. To be able to see the variables of this environment, just click on the eye icon on the right. If you want to create / modify / delete variables, click on the wheel icon to the right of the eye and then click on Manage Environments . A window appears with all the existing environments, as shown in Figure 3.

Environments can be duplicated, downloaded and deleted. By pressing the Import button , environments from other users or machines can be imported. To be able to see the variables of one of them, you have to click on it. Figure 4 shows the variables of the API-Test environment .

In Figure 2 we have seen how the POST call was included{{API_WS_URL}}. In Figure 4 it is observed that the environment variable API_WS_URL contains in turn {{SERVER_URL}}/api. It is easily deduced that the way to call variables within requests (both environment and global) is to use double braces {{}}. For API_WS_URL it called to another variable: SERVER_URL, which in turn calls another 3 variables: SERVER_PROTOCOL, SERVER_PORT y SERVER_ADDRESS. Therefore, {{API_WS_URL}} at the end it contains : http://fr-docker02:12310/api. From this view, apart from seeing the existing environment variables, it is possible to modify the name of the environment, create new variables, modify them and delete them.
To access the global variables, click on the Globals button in Figure 3. Doing so opens a window practically identical to the one shown in Figure 4, which shows all the global variables. The difference with environment variables is that global variables are visible and accessible from any environment with which we work. They are, therefore, common to all the work environments that have been created.
Data and submission of requests
Once we have seen the global and environment variables, we can continue with the analysis of the example request. It is observed that, below the request chain, there are several tabs. We will explain each one separately.
Tab authorization ( Authorization ) serves to introduce the type of authorization using the API, if you make use of some. It is not our case, so we will not go into more details. Figure 2 shows the Headers tab , where the request headers must be entered. For this example, we use 2 headers: Content-Type=application/jsonand Authorization={{SYSDULE_AUTH_TOKEN_EMPLOYEE}}. The first indicates the content type of the request and the second includes an administrator token necessary to create the client (in this specific example).
The body header ( Body ) shows the data that is sent with the request. In this case, a json text is sent with the data of the client to be created. In Figure 5 these customer data are shown, which are the name, surname, telephone number and email.

With the indicated headers, it would already be possible to send the request as long as the data entered is correct. To do this, by pressing the Send button , the result shown in Figure 6 would be obtained. We have left 2 tabs uncommented, because we will discuss them in depth later.

You can see that the client has been created successfully. This is fine when you want to launch a request at a certain point or to check that a request is well composed. However, to do an automatic test we need more things since we will not be in front of the screen checking each result of each request one by one.
Checking and managing responses
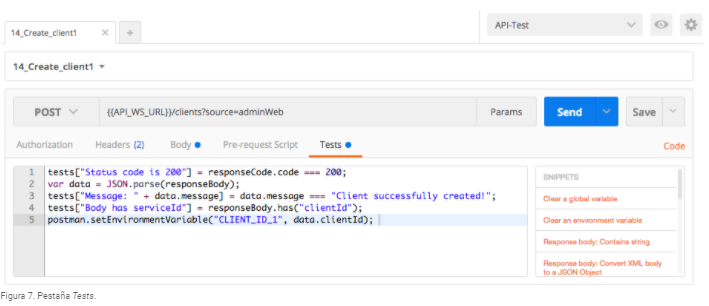
Upon receiving an answer we will want to do at least 2 things. The first, to check that the response is the expected one and, the second, to save the result of the response to be used in new requests. To do this, you need to use the Tests tab . In it, we can do operations with the results of the response. Figure 7 shows this tab. Next we will explain the operations carried out.

In this tab, using javascript, we can check that the response is the expected one and process and store returned results. Let's analyze the first line:
tests["Status code is 200"] = responseCode.code === 200;
Postman automatically stores the code returned in a request in responseCode.code. In this line, we are checking that the returned code is 200 (the request has been made successfully). The initial part of the line is used to show on the results screen, which we will see later, the status of the check, so that if it is fulfilled, a PASS will be displayed and if it has not done so, a FAIL will be displayed .
The second line
var data = JSON.parse(responseBody);
parse the content of responseBody using json and save the result in the variable data.responseBody is the variable where Postman automatically stores the response body for each request.
The third and fourth lines
tests["Message: " + data.message] = data.message === "Client successfully created!";
tests["Body has serviceId"] = responseBody.has("clientId");
they do similar checks to the one done with the code in the first line. In the first case, a check is made of the message received in the result message, which is obtained from the variable data with the dissected results. In the second case, it is verified that it responseBody contains the string "clientId". If it is fulfilled, in each check it will be put PASS and if one is not fulfilled it will put FAIL .
Until now, all the lines of code have been used to check that the results returned in the request are correct. However, the last line
postman.setEnvironmentVariable("CLIENT_ID_1", data.clientId);
gets the client identifier and saves it in an environment variable, for later use in other requests. To do this, the statement is used postman.setEnvironmentVariable, which is used to set a value in an environment variable. In this case, save the customer identifier ( data.clientId) in the variable CLIENTE_ID_1. If said variable does not exist, it is created, and if it already exists, its value is overwritten. If necessary, a pre-processing of the identifier could be performed before storing it.
The results screen that has been discussed appears in the Tests tab of the response, as shown in Figure 8. They show the checks carried out and the results thereof, which, in this case, have all been as expected.

In each case, different checks and different results to be stored will be necessary, so that in the last stay it will be the user who has to decide which tests to carry out and which data to save. It is also interesting to know that in the box to the right of the code there are a few snippets that store some of the most common sentences. Each one is worth looking at to streamline the post-processing of a response.
Since we have verified that the creation request of a client works correctly, we save it and we can start with another. The next logical step would be to check the correct modification of the client. In Figure 9, the request that modifies the data of a customer is shown.

To make this modification we need to identify the client we want to modify. To do this, the request identifier is sent in the request chain. In the previous request we have saved this identifier in the variable CLIENT_ID_1, so we can use this variable to modify the client with the data indicated in the Body tab :
{{API_WS_URL}}/clients/{{CLIENT_ID_1}}
With this example we have seen how requests can be concatenated, taking results from some and using them in others in order to automate the tests of an API. But what do we do if we need dynamic data for some request?
Dynamic data in a request
Let's imagine that we have to check the request made by a user (for example, the one we created) to book an appointment. For this we need a date and time for the appointment. In Figure 10 we can see what this request would look like.

In the body of the request we make use of a date, a service, an employee of that service and a client. The client we use is the same as the one we have previously obtained. We will omit both the employee and the service, but they would be achieved similarly to the customer. Lastly, we use the environment variable isoTime for the date and time of the appointment.
If we were to send the request at a specific time manually, this date could be entered by us choosing the one we want in relation to the current day. That is, if we are on March 30 and we want to make a future reservation, we could use April 1. The problem is that to automate the API tests we need the day to be selected automatically in relation to the current date, since if the test is executed on April 2 we would not really be checking the future appointment reservation, but past .
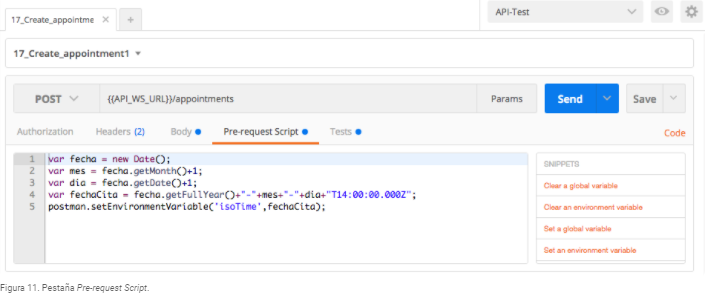
Fortunately, Postman offers us a way to do pre-request processing: the Pre-request Script tab , which we can use to get this date dynamically. In Figure 11 this tab is observed. We will explain the code below.

In the first 4 lines, you get a date that matches the format accepted by the API. In addition, this date will always be 14:00 on the day after the test execution day (line 3), so we ensure that, when the test is executed, a future date will always be selected, as shown. required. The last line stores the date obtained in the variable isoTime, which is used in the body of the request.
Running the test
With these two methods shown, it is possible to create a collection of concatenated requests in which results of one can be used in others. This, together with the possibility of creating data dynamically, allows us to carry out a complete regression test that checks the main functionality of an API. It is possible that, during the creation of this collection, it is necessary to make use of auxiliary requests to obtain certain input data, but it is a small price to pay to automate this test.
Once the collection is finished, to run the test, we only have to open the collection, click on the test folder (if it is in a folder) and press the Run button. Once pressed, a new screen will appear as shown in Figure 12.

Pressing Start Test will run the entire test, displaying the results on the right side of the screen. Also, on the left is a history with previous executions. In Figure 13 an execution of the studied API is shown, where you can see the checks of the request for creating a client, modifying it and obtaining its data.

Some will say that what has been done is not to automate the tests of an API because in the end the user has to be present to press the button, but he really only has to do that. You do not have to go step by step through your saved requests, manually changing the input data from the responses obtained. Anyway, there is a way that the user does not even have to press a button. For this, Jenkins and Newman can be used, as our colleague Lucía explains: Test automation on an API:Postman,Newman and Jenkins.
