

Integration of React components in Microsoft Power Pages
Power Pages, the new member of the Power Platform family
Microsoft announced the relaunch of Power Pages as part of the Power Platform family, replacing PowerApps Portals. Power Pages allows the creation of no-code or low-code Web sites with professional results.
In addition, it is possible to use the data stored in Microsoft Dataverse, as in any other component of the Power Platform.
But there is also room for pro-code in Power Pages. We can create components with React and Typescript that offer a richer and more advanced user experience, or that offer specific functionality that is not possible with Power Pages and Liquid templates.
In this article, we will see how to create and use a PCF component, developed in React, in a Microsoft Power Pages page.
Power Pages for pro-coders
Power Pages has a very intuitive design studio, allowing you to create and design site templates, create pages, styles or use data from the Dataverse like any other Power Platform application and all this via no-code or low-code.
Power Pages allows you to create and design site templates, create pages, styles or use data from the Dataverse
However, it is also a website development platform for pro-coders. In Power Pages we have two types of pro-code development:
- Liquid
- Power Apps Component framework (PCF)
Liquid is a template language that allows you to modify the HTML of your website quite freely. It has logical operators, types, conditions, objects... If our objective is, for example, to obtain data from the Dataverse and display it on the website, without further logic, it is more than enough.
However, Liquid is not a client-side development framework. It has probably happened to all of us that we need to create complex components that offer a much more specific or advanced functionality that is not possible without a framework such as React, Angular or Vue. Or we simply want to reuse components that already exist, or our own components developed in other projects.
This is where the Power Apps Component framework (PCF) comes into play.
We can create PCF components with a client-side development framework, such as React, which we then integrate into our Power Platform applications. And indeed, it is also possible to create PCF components for Power Pages.
Prerequisites for creating a PCF component
Creating the PCF component, we are going to use React as the development framework and TypeScript as the programming language. We assume that we already have the following installed:
- Visual Studio Code
- node.js
- .NET build tools to be able to launch msbuild. Visual Studio version 2019 or 2022 is required
- The VSCode extension of the Microsoft Power Platform CLI: Power Platform Tools

Creation of the PCF component
Let's say we want to use a React component in our Power Pages site, for example, this photo gallery published in npm: react-photo-gallery. The first step is to create the PCF component as follows:
- We open a VSCode
- From a PowerShell terminal, create a folder for the PCF component.
- Next, we create the project for the PCF component with the command pac pcf init command, from within the folder we created:


We already have the project for the PCF component created, now we add the react-photo-gallery package in the usual way, with npm or yarn:

When pac pcf initis launched, a default React component is created by default, the typical HelloWorld.tsx. You can change the name, add new ones, create your own component structure, use class or functional components, HOCs, Hooks... in short, pure React development. Just remember to reference the parent React component from the index.ts file of the PCF component.
In this case, we are going to use the default HelloWorld.tsx created for the image gallery. As you can see in the following image, one of the examples published on the npm page for react-photo-gallery:

We can test that the build is correct with npm run build and see the result in a sandbox environment with npm start:


We already have our PCF component with a React component. The next steps are:
- Create a solution for the PCF component.
- Import the solution into Dataverse.
- Add the PCF component to a Power Pages page.
Create the PCF component solution
In order to upload our component to the Dataverse, a solution has to be created. To do this, we are going to create a folder within the PCF component project and create a solution project with the command pac solution init.

Next, we create a reference in the solution to the PCF component project (which is right in the parent folder) with pac solution add-reference:

The next step is to compile the solution. For this, the Visual Studio msbuild command is used. The location of msbuild must be in the system PATH:

The /restore option is only for the first time the solution is generated, to recompile the solution just launch msbuild /t:build or simply msbuild
With this we have created our component solution. You will see a .zip file in the solution's bindebug path:

Importing the solution into Dataverse
Before the component can be used in Power Pages, the solution created in the previous step must be uploaded to the Dataverse.
It can be uploaded directly from the Power Apps portal, or it can also be automated with the command pac pcf push. In this case, we will simply use the Power Apps portal to upload the solution, following these steps:
- Access to https://make.powerpages.microsoft.com/
- In the menu on the left, click on Solutions
- Click on Import solution
- A wizard opens, simply select the .zip file of the PCF component solution and finish the wizard

It takes a while for the system to upload and deploy the solution, then we will be able to see our solution in the Dataverse:

If you click on the name of the solution, you will see the components it contains. In this case we will only have the PCF component of the photo gallery. The name under which it appears is the name we must use later to reference it from a Power Pages page:

Adding the component to a Power Pages page
To reference the created PCF component, the following steps must be followed:
- Access to https://make.powerpages.microsoft.com/ and open the page of the site where you want to reference the PCF control.
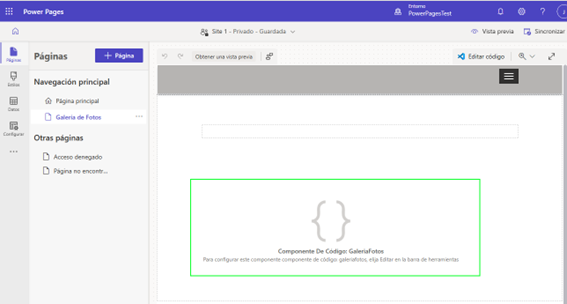
- Click on Edit code. This will open an online Visual Studio Code with the body code of the page.

- Locate the component in the HTML of the page and reference it uses its name with the following syntax in Liquid:


- Save your changes with Ctrl-S and return to the Power Pages browser tab. You will see that the Image Gallery component has been added to your page.
Finally, to see the result of the page, click on Preview and here we have the photo gallery in React on a Power Pages page:

Conclusion
Microsoft Power Pages is the ideal tool for creating professional websites, corporate portals, or public internet applications, due to its no-code and low-code site creation possibilities and its access to the Dataverse.
Added to this, as we have seen, is the ability to create pro-code PCF components in React and Typescript, with functionality as advanced and user experiences as rich as we need.